深度优先

这个家伙好懒,除了文章什么都没留下

0%

随着3G的普及,越来越多的人使用手机上网。

移动设备正超过桌面设备,成为访问互联网的最常见终端。于是,网页设计师不得不面对一个难题:如何才能在不同大小的设备上呈现同样的网页?

如何设计自适应屏幕大小的网页(转)

手机的屏幕比较小,宽度通常在600像素以下;PC的屏幕宽度,一般都在1000像素以上(目前主流宽度是1366×768),有的还达到了2000像素。同样的内容,要在大小迥异的屏幕上,都呈现出满意的效果,并不是一件容易的事。

很多网站的解决方法,是为不同的设备提供不同的网页,比如专门提供一个mobile版本,或者iPhone / iPad版本。这样做固然保证了效果,但是比较麻烦,同时要维护好几个版本,而且如果一个网站有多个portal(入口),会大大增加架构设计的复杂度。

于是,很早就有人设想,能不能”一次设计,普遍适用”,让同一张网页自动适应不同大小的屏幕,根据屏幕宽度,自动调整布局(layout)?

如何设计自适应屏幕大小的网页(转)

一、”自适应网页设计”的概念

2010年,Ethan Marcotte提出了”自适应网页设计”(Responsive Web Design)这个名词,指可以自动识别屏幕宽度、并做出相应调整的网页设计。

他制作了一个范例,里面是《福尔摩斯历险记》六个主人公的头像。如果屏幕宽度大于1300像素,则6张图片并排在一行。

如何设计自适应屏幕大小的网页(转)

如果屏幕宽度在600像素到1300像素之间,则6张图片分成两行。

如何设计自适应屏幕大小的网页(转)

如果屏幕宽度在400像素到600像素之间,则导航栏移到网页头部。

如何设计自适应屏幕大小的网页(转)

如果屏幕宽度在400像素以下,则6张图片分成三行。

如何设计自适应屏幕大小的网页(转)

mediaqueri.es上面有更多这样的例子。

这里还有一个测试小工具,可以在一张网页上,同时显示不同分辨率屏幕的测试效果,我推荐安装。

二、允许网页宽度自动调整

“自适应网页设计”到底是怎么做到的?其实并不难。

首先,在网页代码的头部,加入一行viewport元标签

viewport是网页默认的宽度和高度,上面这行代码的意思是,网页宽度默认等于屏幕宽度(width=device-width),原始缩放比例(initial-scale=1)为1.0,即网页初始大小占屏幕面积的100%。

所有主流浏览器都支持这个设置,包括IE9。对于那些老式浏览器(主要是IE6、7、8),需要使用css3-mediaqueries.js

“自适应网页设计”到底是怎么做到的?其实并不难。

首先,在网页代码的头部,加入一行viewport元标签。

1
<meta name=”viewport” content=”width=device-width, initial-scale=1″ />

viewport是网页默认的宽度和高度,上面这行代码的意思是,网页宽度默认等于屏幕宽度(width=device-width),原始缩放比例(initial-scale=1)为1.0,即网页初始大小占屏幕面积的100%。

所有主流浏览器都支持这个设置,包括IE9。对于那些老式浏览器(主要是IE6、7、8),需要使用CSS3-mediaqueries.js

1
2
3
<!–[if lt IE 9]>
<script src=”http://[css3](http://lib.csdn.net/base/css3)-mediaqueries-js.googlecode.com/svn/trunk/css3-mediaqueries.js”></script>
<![endif]–>

三、不使用绝对宽度

由于网页会根据屏幕宽度调整布局,所以不能使用绝对宽度的布局,也不能使用具有绝对宽度的元素。这一条非常重要。

具体说,CSS代码不能指定像素宽度:

1
width:300px;

只能指定百分比宽度:

1
width: 98%;

或者

1
width:auto;

四、相对大小的字体
字体也不能使用绝对大小(px),而只能使用相对大小(em)。

1
2
3
body {
font: normal 100% Helvetica, Arial, sans-serif;
}

上面的代码指定,字体大小是页面默认大小的100%,即16像素。

1
2
3
h1 {
font-size: 1.5em;
}

然后,h1的大小是默认大小的1.5倍,即24像素(24/16=1.5)。

1
2
3
small {
font-size: 0.875em;
}

small元素的大小是默认大小的0.875倍,即14像素(14/16=0.875)。

五、流动布局(fluid grid)

“流动布局”的含义是,各个区块的位置都是浮动的,不是固定不变的。

1
2
3
4
5
6
7
8
.main {
float: right;
width: 70%;
}
.leftBar {
float: left;
width: 25%;
}

float的好处是,如果宽度太小,放不下两个元素,后面的元素会自动滚动到前面元素的下方,不会在水平方向overflow(溢出),避免了水平滚动条的出现。

另外,绝对定位(position: absolute)的使用,也要非常小心。

六、选择加载CSS

“自适应网页设计”的核心,就是CSS3引入的Media Query模块。

它的意思就是,自动探测屏幕宽度,然后加载相应的CSS文件。

1
<link rel=”stylesheet” type=”text/css” media=”screen and (max-device-width: 400px)” href=”tinyScreen.css” />

上面的代码意思是,如果屏幕宽度小于400像素(max-device-width: 400px),就加载tinyScreen.css文件。

1
2
3
<link rel=”stylesheet” type=”text/css”
media=”screen and (min-width: 400px) and (max-device-width: 600px)”
href=”smallScreen.css” />

如果屏幕宽度在400像素到600像素之间,则加载smallScreen.css文件。

除了用html标签加载CSS文件,还可以在现有CSS文件中加载。

1
@import url(“tinyScreen.css”) screen and (max-device-width: 400px);

七、CSS的@media规则

同一个CSS文件中,也可以根据不同的屏幕分辨率,选择应用不同的CSS规则。

1
2
3
4
5
6
7
8
9
10
@media screen and (max-device-width: 400px) {
.column {
float: none;
width:auto;
}

#sidebar {
display:none;
}
}

上面的代码意思是,如果屏幕宽度小于400像素,则column块取消浮动(float:none)、宽度自动调节(width:auto),sidebar块不显示(display:none)。

八、图片的自适应(fluid image)

除了布局和文本,”自适应网页设计”还必须实现图片的自动缩放。

这只要一行CSS代码:

1
img { max-width: 100%;}

这行代码对于大多数嵌入网页的视频也有效,所以可以写成:

1
img, object { max-width: 100%;}

老版本的IE不支持max-width,所以只好写成:

1
img { width: 100%; }

此外,windows平台缩放图片时,可能出现图像失真现象。这时,可以尝试使用IE的专有命令:

1
img { -ms-interpolation-mode: bicubic; }

或者,Ethan Marcotte的imgSizer.js。

1
2
3
4
addLoadEvent(function() {
var imgs = document.getElementByIdx_x_x(“content”).getElementsByTagName_r(“img”);
imgSizer.collate(imgs);
});

不过,有条件的话,最好还是根据不同大小的屏幕,加载不同分辨率的图片。有很多方法可以做到这一条,服务器端和客户端都可以实现。
最近有点懒,也有点忙,大半个月时间没写博客了。
历经十五天,第二个实训项目终于写完了,也终于有时间来记录项目中遇到的一些问题。

将web中信息导出至Excel中早就不陌生了,大一做一个比赛项目《考勤管理系统》时,就操作过将数据导出成Excel文件和将Excel文件导入进数据库,当时比较“稚嫩”,啥也不懂,采用office的api进行导出操作,然后提交后,发现在没有安装office的电脑上就用不了,它必须依赖于office的插件才能运行。这次吸取的上次的教训,百度又找到了一个方法,用NPOI进行excel操作。

别人说:这个NPOI操作Excel,应该是最好的方案了,没有之一,使用NPOI能够帮助开发者在没有安装微软Office的情况下读写Office 97-2003的文件,支持的文件格式包括xls, doc, ppt等。NPOI是构建在POI 3.x版本之上的,它可以在没有安装Office的情况下对Word/Excel文档进行读写操作。

一、下载NPOI

先去官网:http://npoi.codeplex.com/。

目前用的版本是:NPOI 2.2.1,发现不同版本在使用上有好大的区别,网上看其他人写的也存在一些差异,有些属性的大小写不同,方法不同等,不过还是换汤不换药的。

二、引用文件

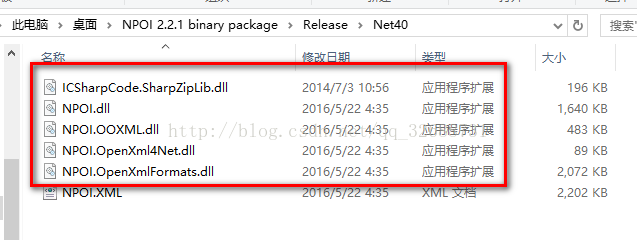
解压文件后可以选择需要引入dll(可以选择.net2.0或者.net4.0的dll),然后在网站中添加引用

我选的是4.0的,将下面四个文件引用进去

三、导出Excel方法

1
2
3
4
5
6
7
8
9
10
11
12
13
14
15
16
17
18
19
20
21
22
23
24
25
26
27
28
29
30
31
32
33
34
35
36
37
38
39
40
41
42
43
44
45
46
47
48
49
50
51
52
53
54
55
56
57
58
59
60
61
62
63
64
65
66
67
68
69
70
71
72
73
74
75
76
77
78
79
80
81
82
83
84
85
86
87
88
89
90
91
92
93
94
95
96
97
98
99
100
101
102
103
104
105
106
107
108
109
110
111
112
113
114
115
116
117
118
119
120
121
122
123
124
125
126
127
128
129
130
131
132
133
134
135
136
137
138
139
140
141
142
143
144
145
146
147
148
149
150
151
152
153
154
155
156
157
158
159
160
161
162
163
164
165
166
167
168
169
170
171
172
173
174
175
176
177
178
179
180
181
182
183
184
185
186
187
188
189
190
191
192
/// <summary>
/// 导出excel
/// </summary>
/// <returns></returns>
public ActionResult ExcelINTest()
{
HSSFWorkbook book = new HSSFWorkbook();
HSSFSheet sheet = book.CreateSheet("Sheet1") as HSSFSheet;
//设置列宽
sheet.SetColumnWidth(1, 10 * 256);
sheet.SetColumnWidth(2, 10 * 256);
sheet.SetColumnWidth(3, 10 * 256);
sheet.SetColumnWidth(4, 15 * 256);
sheet.SetColumnWidth(5, 25 * 256);
sheet.SetColumnWidth(6, 10 * 256);


#region 表头部分
//合并单元格
HSSFRow dataRow = sheet.CreateRow(1) as HSSFRow;
dataRow = sheet.CreateRow(1) as HSSFRow;
CellRangeAddress region = new CellRangeAddress(0, 0, 1, 6);
//CellRangeAddress()该方法的参数次序是:开始行号,结束行号,开始列号,结束列号。
sheet.AddMergedRegion(region);
IRow hrow = sheet.CreateRow(0);
hrow.Height = 20 * 25;
ICell icellltop0 = hrow.CreateCell(1);

//表头样式
IFont font12 = book.CreateFont();
font12.FontHeightInPoints = 14;
font12.FontName = "微软雅黑";
font12.Boldweight = short.MaxValue;
font12.Color = Black.Index;

ICellStyle cellStyle = book.CreateCellStyle();
cellStyle.Alignment = NPOI.SS.UserModel.HorizontalAlignment.Center;
cellStyle.BorderBottom = BorderStyle.Thin;
cellStyle.BorderLeft = BorderStyle.Thin;
cellStyle.BorderRight = BorderStyle.Thin;
cellStyle.BorderTop = BorderStyle.Thin;

for (int i = region.FirstRow; i <= region.LastRow; i++)
{
IRow row = HSSFCellUtil.GetRow(i, sheet);
for (int j = region.FirstColumn; j <= region.LastColumn; j++)
{
ICell singleCell = HSSFCellUtil.GetCell(row, (short)j);
singleCell.CellStyle = cellStyle;
}
}

cellStyle.SetFont(font12);
icellltop0.CellStyle = cellStyle;
icellltop0.SetCellValue("此处程序自动生成");
#endregion

#region 标题部分
ICellStyle TitleStyle = book.CreateCellStyle();
TitleStyle.FillForegroundColor = NPOI.HSSF.Util.HSSFColor.PaleBlue.Index;
TitleStyle.FillPattern = FillPattern.SolidForeground;
TitleStyle.Alignment = NPOI.SS.UserModel.HorizontalAlignment.Center;
TitleStyle.BorderBottom = BorderStyle.Thin;
TitleStyle.BorderLeft = BorderStyle.Thin;
TitleStyle.BorderRight = BorderStyle.Thin;
TitleStyle.BorderTop = BorderStyle.Thin;

IRow TitleRow = sheet.CreateRow(3);
ICell Titlecell1 = TitleRow.CreateCell(1);
Titlecell1.CellStyle = TitleStyle;
Titlecell1.SetCellValue("会员卡号");

ICell Titlecell2 = TitleRow.CreateCell(2);
Titlecell2.CellStyle = TitleStyle;
Titlecell2.SetCellValue("姓名");

ICell Titlecell3 = TitleRow.CreateCell(3);
Titlecell3.CellStyle = TitleStyle;
Titlecell3.SetCellValue("性别");

ICell Titlecell4 = TitleRow.CreateCell(4);
Titlecell4.CellStyle = TitleStyle;
Titlecell4.SetCellValue("电话");

ICell Titlecell5 = TitleRow.CreateCell(5);
Titlecell5.CellStyle = TitleStyle;
Titlecell5.SetCellValue("登记时间");

ICell Titlecell6 = TitleRow.CreateCell(6);
Titlecell6.CellStyle = TitleStyle;
Titlecell6.SetCellValue("会员等级");
#endregion

int lenght = 0, man = 0, woman = 0;
#region sqltoExcel
using (Models.MPMS_DBDataContext db = new Models.MPMS_DBDataContext())
{
MPMS.Models.Users user = Session["userInfo"] as MPMS.Models.Users;
int S_ID = (int)user.S_ID;
var data = db.MemCards.Where(p => p.S_ID == S_ID).ToList();
lenght = data.Count();
for (int i = 0; i < lenght; i++)
{
IRow row = sheet.CreateRow(i + 4);
row.CreateCell(1).SetCellValue(data[i].MC_CardID);

row.CreateCell(2).SetCellValue(data[i].MC_Name);

string sex = data[i].MC_Sex == 0 ? "未知" : data[i].MC_Sex == 1 ? "男" : "女";
if (data[i].MC_Sex == 1)
man++;
if (data[i].MC_Sex == 2)
woman++;
row.CreateCell(3).SetCellValue(sex);

row.CreateCell(4).SetCellValue(data[i].MC_Mobile);

string date = DateTime.Parse(data[i].MC_CreateTime.ToString()).ToString();
row.CreateCell(5).SetCellValue(date);

var jj = db.CardLevels.FirstOrDefault(p => p.CL_ID == data[i].CL_ID);
row.CreateCell(6).SetCellValue(jj.CL_LevelName);
}
}
#endregion

#region 统计部分
ICellStyle SumStyle = book.CreateCellStyle();
SumStyle.FillForegroundColor = NPOI.HSSF.Util.HSSFColor.PaleBlue.Index;
SumStyle.FillPattern = FillPattern.SolidForeground;
SumStyle.Alignment = NPOI.SS.UserModel.HorizontalAlignment.Center;
SumStyle.BorderBottom = BorderStyle.Thin;
SumStyle.BorderLeft = BorderStyle.Thin;
SumStyle.BorderRight = BorderStyle.Thin;
SumStyle.BorderTop = BorderStyle.Thin;

IRow SumRow = sheet.CreateRow(1);
ICell cell1 = SumRow.CreateCell(1);
cell1.SetCellValue("总人数");
cell1.CellStyle = SumStyle;

ICell cell2 = SumRow.CreateCell(2);
cell2.SetCellValue(lenght);
cell2.CellStyle = SumStyle;

ICell cell3 = SumRow.CreateCell(3);
cell3.SetCellValue("男生人数");
cell3.CellStyle = SumStyle;

ICell cell4 = SumRow.CreateCell(4);
cell4.SetCellValue(man);
cell4.CellStyle = SumStyle;

ICell cell5 = SumRow.CreateCell(5);
cell5.SetCellValue("女生人数");
cell5.CellStyle = SumStyle;

ICell cell6 = SumRow.CreateCell(6);
cell6.SetCellValue(woman);
cell6.CellStyle = SumStyle;
#endregion

#region 边框设置
ICellStyle borStyle = book.CreateCellStyle();
borStyle.Alignment = NPOI.SS.UserModel.HorizontalAlignment.Center;
borStyle.BorderBottom = BorderStyle.Thin;
borStyle.BorderLeft = BorderStyle.Thin;
borStyle.BorderRight = BorderStyle.Thin;
borStyle.BorderTop = BorderStyle.Thin;

for (int i = 2; i <= lenght + 3; i++)
{
if (i == 3) continue;
IRow row = HSSFCellUtil.GetRow(i, sheet);
for (int j = 1; j <= 6; j++)
{
ICell singleCell = HSSFCellUtil.GetCell(row, (short)j);
singleCell.CellStyle = borStyle;
}
}
#endregion

// 写入到客户端
System.IO.MemoryStream ms = new System.IO.MemoryStream();
book.Write(ms);
Response.AddHeader("Content-Disposition", string.Format("attachment; filename={0}.xls", DateTime.Now.ToString("yyyyMMddHHmmssfff")));
Response.BinaryWrite(ms.ToArray());
book = null;
ms.Close();
ms.Dispose();
return Content("OK");
}

一、自定义错误页面

有些时候,我们想使用自定义的错误页面,该怎么处理那。

翻页其他大牛写的博客,看到有这种方式,自定义属性Class继承FileterAttribute,

重写OnException方法,代码如下

1
2
3
4
5
6
7
8
9
10
11
12
13
14
15
16
17
18
19
20
21
22
23
24
25
26
27
28
29
30
31
32
33
34
35
36
37
38
39
40
41
42
43
public class MyErrorAttribute: HandleErrorAttribute
{
public override void OnException(ExceptionContext filterContext)
{
//获取异常对象
Exception ex = filterContext.Exception;
//记录错误日志

//记录出现错误的IP地址
string strIP = filterContext.HttpContext.Request.UserHostAddress;
string strUser = System.Environment.MachineName; ;
string strPath = filterContext.HttpContext.Request.Path;

StringBuilder sb = new StringBuilder();
sb.Append("IP:【" + strIP + "】" + Environment.NewLine);
sb.Append("UserName:【" + strUser + "】" + Environment.NewLine);
sb.Append("Action:【" + strPath + "】" + Environment.NewLine);
sb.Append("Error in 【" + filterContext.HttpContext.Request.Url.ToString() + "】" + Environment.NewLine);
sb.Append("Error Message 【" + ex.Message + "】" + Environment.NewLine);
sb.Append("Browser 【" + filterContext.HttpContext.Request.Browser.Browser + "||");
sb.Append(filterContext.HttpContext.Request.Browser.Id + "||");
sb.Append(filterContext.HttpContext.Request.Browser.Version + "||");
sb.Append(filterContext.HttpContext.Request.Browser.Beta + "】");
//记录错误
WriteError(sb.ToString());

//导向友好错误界面
filterContext.Result = new RedirectToRouteResult(new RouteValueDictionary(
new
{
controller = "Error",
action = "Page404",
returnUrl = filterContext.HttpContext.Request.Url,
returnMessage = "页面不存在!"
}
));

//重要!!!告诉系统异常已经处理!!
//如果没有这个步骤,系统还是会按照正常的异常处理流程做
filterContext.ExceptionHandled = true;

//base.OnException(filterContext);
}

1、记录错误信息

1
2
3
4
5
6
7
8
9
10
11
12
13
14
15
16
17
18
19
20
21
22
23
24
25
26
27
28
/// <summary>
/// 用于将错误信息输出到txt文件
/// </summary>
/// <param name="errorMessage">错误详细信息</param>
public static void WriteError(string errorMessage)
{
try
{
string path = "~/Error/" + DateTime.Today.ToString("yyMMdd") + ".txt";
if (!File.Exists(System.Web.HttpContext.Current.Server.MapPath(path)))
{
File.Create(System.Web.HttpContext.Current.Server.MapPath(path)).Close();
}
using (StreamWriter w = File.AppendText(System.Web.HttpContext.Current.Server.MapPath(path)))
{
w.WriteLine("\r\nLog Entry : ");
w.WriteLine("DateTime 【{0}】", DateTime.Now.ToString(CultureInfo.InvariantCulture));
w.WriteLine(errorMessage);
w.WriteLine("***********************************************************************************************");
w.Flush();
w.Close();
}
}
catch (Exception ex)
{
WriteError(ex.Message);
}
}

网上大神写的,他分得比较的细:

1
2
3
4
5
6
7
8
9
10
11
12
13
14
15
16
17
18
19
20
21
22
23
24
25
26
27
28
29
30
31
32
33
34
35
36
37
38
39
40
41
42
public class BaseHandleErrorAttribute : FilterAttribute, IExceptionFilter
{
public void OnException(ExceptionContext filterContext)
{
if (filterContext.ExceptionHandled == true)
{
HttpException httpExce = filterContext.Exception as HttpException;
if (httpExce != null && httpExce.GetHttpCode() != 500)//为什么要特别强调500 因为MVC处理HttpException的时候,如果为500 则会自动将其ExceptionHandled设置为true,那么我们就无法捕获异常
{
return;
}
}
Exception exception = filterContext.Exception;
if (exception != null)
{
HttpException httpException = exception as HttpException;
if (httpException != null)
{
//网络错误
filterContext.Controller.ViewBag.UrlRefer = filterContext.HttpContext.Request.UrlReferrer;
int DataEroorCode = httpException.GetHttpCode();
if (DataEroorCode == 404)
{
filterContext.HttpContext.Response.Redirect("~/SysError/404");
}
else if (DataEroorCode == 500)
{
filterContext.HttpContext.Response.Redirect("~/SysError/500");
}
else
filterContext.HttpContext.Response.Redirect("~/SysError/" + DataEroorCode);

//写入日志 记录
filterContext.ExceptionHandled = true;//设置异常已经处理
}
else
{
//编程或者系统错误,不处理,留给HandError处理
}
}
}
}