深度优先

这个家伙好懒,除了文章什么都没留下

0%

Pymssql使用
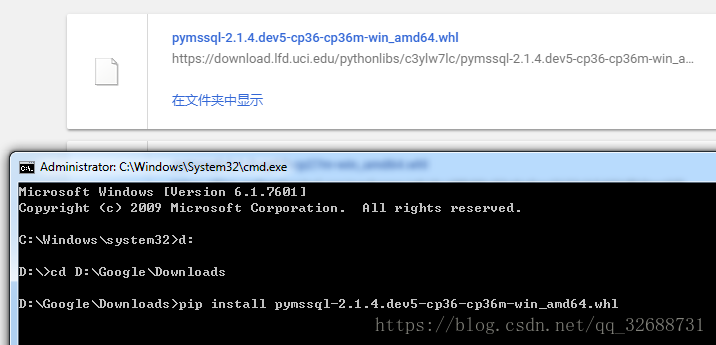
麻烦的是,经常安装失败。需要先下载包,再在本地进行安装。

1
pip install pymssql

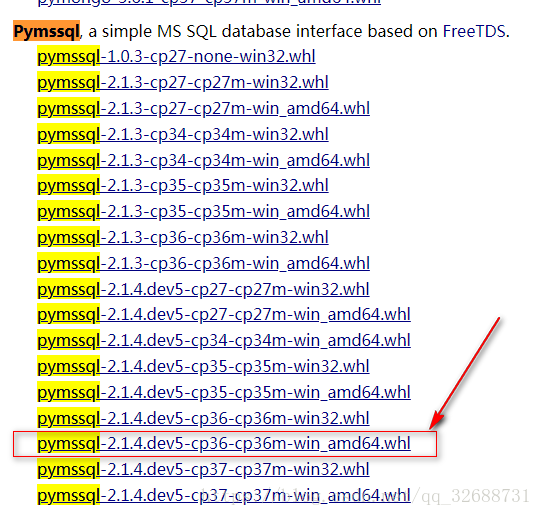
传送门:https://www.lfd.uci.edu/~gohlke/pythonlibs/#pymssql
可根据自己Python的版本来下载,之前安装Python3.7使用有些问题

安装pymssql:

pymssql对数据库的一些操作:

1
2
3
4
5
6
7
8
9
10
11
12
13
14
15
16
17
18
19
20
21
22
23
24
25
26
27
28
29
30
31
32
33
34
35
36
37
38
39
40
41
42
43
44
45
46
47
48
49
50
51
52
53
54
55
56
57
58
59
60
61
62
63
64
65
66
67
68
69
70
import pymssql

# server 数据库服务器名称或IP
# user 用户名
# password 密码
# database 数据库名称

server = "*******"
user = "sa"
password = "*******"
database = "Python"
conn = pymssql.connect(server, user, password, database)
cursor = conn.cursor()

# 新建表
def CreateTable():
sql = """
IF OBJECT_ID('persons', 'U') IS NOT NULL DROP TABLE persons
CREATE TABLE persons (id INT NOT NULL identity(1,1),name VARCHAR(100),age int,PRIMARY KEY(id))
"""
cursor.execute(sql)
conn.commit()

# 批量插入数据
def InsertData():
sql = "INSERT INTO persons(name,age) VALUES (%s, %d)"
data = [
('zhangsan', 15),
('lisi', 16),
('wangwu T.', 17)]
cursor.executemany(sql, data)
# 如果没有指定autocommit属性为True的话就需要调用commit()方法
conn.commit()

# 删除操作
def DeleteData():
sql = "delete persons where id=5"
cursor.execute(sql)
conn.commit()

# 查询操作
def SelectTable():
sql = "SELECT * FROM persons"
cursor.execute(sql)
row = cursor.fetchone()
while row:
print("ID=%d, Name=%s" % (row[0], row[1]))
row = cursor.fetchone()
# 也可以使用for循环来迭代查询结果
# for row in cursor:
# print("ID=%d, Name=%s" % (row[0], row[1]))

# 修改操作
def UpdateData():
sql = "update [persons] set name ='Python1' where id<3"
cursor.execute(sql)
conn.commit()

def main():
# CreateTable()
InsertData()
DeleteData()
UpdateData()
SelectTable()
conn.close()

if __name__ == '__main__':
main()

# 关闭连接

mssql_helper:

1
2
3
4
5
6
7
8
9
10
11
12
13
14
15
16
17
18
19
20
21
22
23
24
25
26
27
28
29
import pymssql

class MSSQL:
def __init__(self,host,user,pwd,db): #类的构造函数,初始化数据库连接ip或者域名,以及用户名,密码,要连接的数据库名称
self.host=host
self.user=user
self.pwd=pwd
self.db=db
def __GetConnect(self): #得到数据库连接信息函数, 返回: conn.cursor()
self.conn=pymssql.connect(host=self.host,user=self.user,password=self.pwd,database=self.db,charset='utf8')
cur=self.conn.cursor() #将数据库连接信息,赋值给cur。
if not cur:
return(NameError,"连接数据库失败")
else:
return cur

#执行查询语句,返回的是一个包含tuple的list,list的元素是记录行,tuple的元素是每行记录的字段
def ExecQuery(self,sql): #执行Sql语句函数,返回结果
cur = self.__GetConnect() #获得数据库连接信息
cur.execute(sql) #执行Sql语句
resList = cur.fetchall() #获得所有的查询结果
#查询完毕后必须关闭连接
self.conn.close() #返回查询结果
return resList
def ExecNonQuery(self,sql):
cur = self.__GetConnect()
cur.execute(sql)
self.conn.commit()
self.conn.close()

使用:

1
2
3
4
5
6
7
8
9
10
11
12
13
14
15
16
17
18
19
20
import mssql_helper

server = "********"
user = "sa"
password = "*********"
database = "Python"

mssql =""

def main():
global mssql
mssql = mssql_helper.MSSQL(server,user,password,database)

def test():
rows = mssql.ExecQuery("SELECT * FROM persons")
print(rows)

if __name__ == '__main__':
main()
test()

用python写爬虫整的很方便,弄了个模拟登陆,登陆后带上token和cooke请求页面

就拿gitlab练下手了,这个还是有一丢丢麻烦的

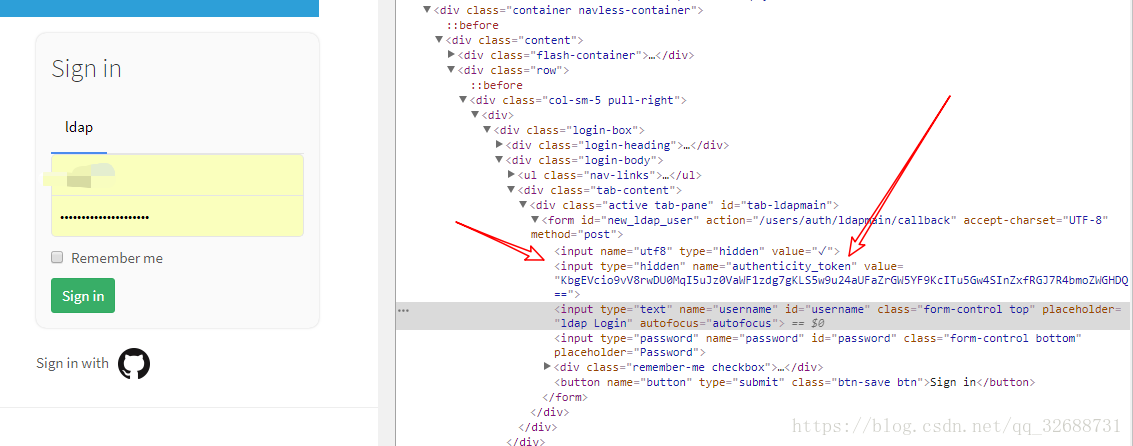
一、登陆界面

获取隐藏域中的token,构建表单的时候需要

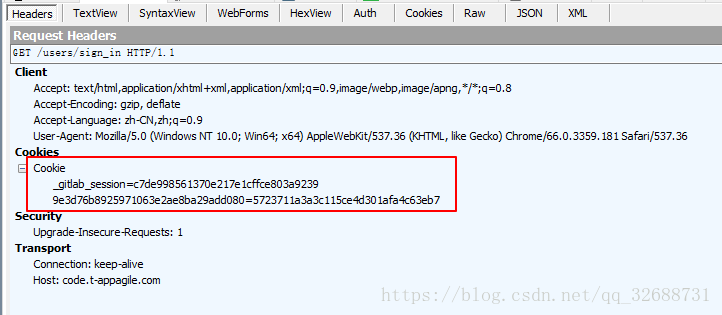
获取到这个_gitlab_session,登陆校验时需要带着这个信息

准备好token和cookie,当然还需要一个能登陆用户名和密码

二、登陆验证

登陆验证就是构建表单,不知为何还要传一个utf-8参数

按说应该可以登陆进去的,但是….登陆进去后页面会重定向到一个界面。接着呢,只好看fiddle里抓包的信息

之前一直以为没有登陆成功,其实已经登陆成功,但是请求需要登陆页面,还是会跳转到登陆界面。。

原来登陆成功后会获取一个新的session,然后需要调整 Headers里面的信息

再用这个headers去请求需要登陆的页面,发现都可以了

代码如下,写得很随意:

1
2
3
4
5
6
7
8
9
10
11
12
13
14
15
16
17
18
19
20
21
22
23
24
25
26
27
28
29
30
31
32
33
34
35
36
37
38
39
40
41
42
43
44
45
46
47
48
49
50
51
52
53
54
55
56
57
58
59
60
61
62
63
64
65
66
67
68
69
70
71
72
73
74
75
76
77
78
79
80
81
82
83
84
85
86
87
88
89
"""
http://code.t-appagile.com/users/sign_in

http://code.t-appagile.com/users/sign_in
"""
import requests
import json
import string
from bs4 import BeautifulSoup
login = "http://code.t-appagile.com/users/sign_in"
call = "http://code.t-appagile.com/users/auth/ldapmain/callback"

headers = {
'Accept': 'text/html,application/xhtml+xml,application/xml;q=0.9,image/webp,image/apng,*/*;q=0.8',
'Accept-Encoding': 'gzip, deflate',
'Accept-Language': 'en-US,en;q=0.9,zh-CN;q=0.8,zh;q=0.7',
'Cache-Control': 'no-cache',
# 'Content-Length':'183',

'Content-Type': 'application/x-www-form-urlencoded',
'Cookie': '',
'Host': 'code.t-appagile.com',
'Origin': 'http://code.t-appagile.com',
'Proxy-Connection': 'keep-alive',

'Referer': 'http://code.t-appagile.com/users/sign_in',
'Upgrade-Insecure-Requests': '1',
'User-Agent': 'Mozilla/5.0 (Windows NT 6.1; WOW64) AppleWebKit/537.36 (KHTML, like Gecko) Chrome/64.0.3282.186 Safari/537.36',
}


def HttpPost(apiUrl, data):
try:
global headers
r = requests.post(apiUrl,headers=headers, data=data)

cook = r.request.headers["Cookie"].split('=')
lowCook = headers["Cookie"].split('=')

newCook=lowCook[0]+'='+lowCook[1]+'='+cook[2]
headers["Cookie"] = newCook
print("登陆成功:",newCook)
return r
except:
return

def HttpGet(apiUrl):
try:
global headers
r = requests.get(apiUrl)
cook = ""
for c in r.cookies:
cook += c.name + "="+c.value + ";"

headers["Cookie"] = cook
print("登陆前的:",cook)

return r.text
except:
return

def HttpGetLcmm(apiUrl):
try:
r = requests.get(apiUrl,headers=headers)
return r.text
except:
return


res = HttpGet(login)
html = BeautifulSoup(res,"html.parser")

token = html.find_all(type="hidden")[1]["value"]

postData ={}
postData["utf8"] ="✓"
postData["authenticity_token"] =token
postData["username"] ="你的账号"
postData["password"] ="你的密码"


res = HttpPost(call,postData)

# print(res.status_code)
# print(res.text)
# print(html)

res = HttpGetLcmm("http://code.t-appagile.com/SI.Web/lcmm-web")
print('ok!')

发现,写模拟登陆需要很耐心,对比真实的http请求headers里面的信息,再去构建模拟请求的

有时间再弄个有验证码的,应该也简单,毕竟都有验证码识别的Api了

1
2
3
4
5
6
7
8
9
10
11
12
13
14
15
16
17
18
19
20
21
22
23
24
25
26
27
28
29
30
31
32
33
34
35
36
37
38
39
40
41
42
43
44
45
46
47
48
49
50
51
52
53
54
55
56
57
58
59
60
61
62
63
64
65
66
67
68
69
70
71
72
73
74
75
76
77
78
79
80
81
82
83
84
85
86
87
88
89
90
91
92
93
94
95
# -*- coding=utf-8 -*-
import requests

"""
模拟HttpPost请求
"""
def HttpPost(apiUrl, token, data):
try:
headers = {'Content-Type': 'application/json',
'Authorization': 'Bearer '+token}
r = requests.post(apiUrl, headers=headers, json=data).json()
return r
except:
return


"""
模拟HttpGet请求
"""
def HttpGet(apiUrl, token, data):
headers = {'Content-Type': 'application/json',
'Authorization': 'Bearer '+token}
try:
r = requests.get(apiUrl, headers=headers, data=data).json()
return r
except:
return

"""
登录获取token
"""
def GetToken():
apiUrl = 'http://88.88.88.88:8081/token'
data = "grant_type=password&username=peter&password=123123&client_id=1234&client_secret=5678"
try:
headers = {'Content-Type': 'application/json'}
result = requests.post(apiUrl, headers=headers, data=data).json()
token = result.get("access_token")
return token
except:
return

"""
开启trip
"""
def PostStartTrip(token):
apiUrl = 'http://88.88.88.88:8081/api/Trip/start'
data = {"CarId": "2", "Mass": "1111"}
try:
result = HttpPost(apiUrl, token, data)
tripId = result.get("tripId")
return tripId
except:
return

"""
上传Trip数据
"""
def UploadTripInfo(token, tripId):
apiUrl = "http://88.88.88.88:8081/api/Trip/upload"
TripData = [
{"DTime": 121212, "LAT": 11111, "LON": 11212, "Speed": 1121,
"Altitude": 1212, "AccT": 1212, "AccX": 1212, "AccY": 121, "AccZ": 1212},
{"DTime": 121212, "LAT": 11111, "LON": 11212, "Speed": 1121,
"Altitude": 1212, "AccT": 1212, "AccX": 1212, "AccY": 121, "AccZ": 1212}
]
data = {"TripId": tripId, "TripData": TripData}
HttpPost(apiUrl, token, data)

# # 登录
# token = GetToken()
# # 开启trip
# tripId = PostStartTrip(token)
# # 上传Trip数据
# UploadTripInfo(token,tripId)


# res = requests.get("http://bfsdfs.com")
# print(type(res))
# print(res.status_code)
# res.encoding = "utf-8"
# # print(res.text)
# print(res.cookies)

response = requests.get("http://www.baidu.com")
#打印请求页面的状态(状态码)
print(type(response.status_code),response.status_code)
#打印请求网址的headers所有信息
print(type(response.headers),response.headers)
#打印请求网址的cookies信息
print(type(response.cookies),response.cookies)
#打印请求网址的地址
print(type(response.url),response.url)
#打印请求的历史记录(以列表的形式显示)
print(type(response.history),response.history)