深度优先

这个家伙好懒,除了文章什么都没留下

0%

转自:https://www.cnblogs.com/chenwolong/archive/2017/05/18/6872672.html

原标题:C# 多线程 Parallel.For 和 For 谁的效率高?那么 Parallel.ForEach 和 ForEach 呢?

今天和大家探讨一个问题:Parallel.For 和 For 谁的效率高呢?

从CPU使用方面而言,Parallel.For 属于多线程范畴,可以开辟多个线程使用CPU内核,也就是说可以并行处理程序。For 循环是单线程的,一个线程执行完所有循环。

因此你会认为:多线程的效率肯定高于单线程。但这样认为是错误的!

例如下面程序:

1
2
3
4
5
6
7
8
9
10
11
12
13
14
15
16
17
18
19
20
21
22
23
24
25
26
27
static void Main(string[] args)
{
Stopwatch sw = new Stopwatch();
sw.Start();

ParallelLoopResult result =
Parallel.For(0, 10000, i =>
{
Console.Write("");

});
sw.Stop();
TimeSpan ts2 = sw.Elapsed;
Console.WriteLine("Parallel.For总共花费{0}ms.", ts2.TotalMilliseconds);

//
Stopwatch sw_Eq = new Stopwatch();
sw_Eq.Start();
for (int i = 0; i < 10000; i++)
{
Console.Write("");
}
sw_Eq.Stop();
TimeSpan tssw_Eq = sw_Eq.Elapsed;
Console.WriteLine("for总共花费{0}ms.", tssw_Eq.TotalMilliseconds);
Console.ReadKey();
}

额,为什么For 循环要比Parallel.For 效率要高呢?

这是因为循环体内执行的任务开销太小,仅仅是输出一个空字符串而已。微软的文章已经指出任务的开销大小对并行任务的影响。如果任务很小,那么由于并行管理的附加开销(任务分配,调度,同步等成本),可能并行执行并不是优化方案。这也是上述程序For效率高出的原因。

如果在循环体内执行向数据库插入操作,那么Parallel.For 效率就会高出,在此,我们认为每向数据库插入一条记录花费1毫秒时间,将程序修改如下:

1
2
3
4
5
6
7
8
9
10
11
12
13
14
15
16
17
18
19
20
21
22
23
24
25
26
27
28
29
30
31
32
33
class Program
{
static void Main(string[] args)
{
Stopwatch sw = new Stopwatch();
sw.Start();

ParallelLoopResult result =
Parallel.For(0, 10, i =>
{
Console.Write("");
Thread.Sleep(1);

});
sw.Stop();
TimeSpan ts2 = sw.Elapsed;
Console.WriteLine("Parallel.For总共花费{0}ms.", ts2.TotalMilliseconds);

//
Stopwatch sw_Eq = new Stopwatch();
sw_Eq.Start();
for (int i = 0; i < 10; i++)
{
Console.Write("");
Thread.Sleep(1);
}
sw_Eq.Stop();
TimeSpan tssw_Eq = sw_Eq.Elapsed;
Console.WriteLine("for总共花费{0}ms.", tssw_Eq.TotalMilliseconds);
Console.ReadKey();
}
}
}

执行结果大大改变:

相信到此,大家应该明白了吧!也就说For是同步,Parallel.For 是异步执行。当然,我们也可以使用Thread实现异步编程:

代码如下:

1
2
3
4
5
6
7
8
9
10
11
12
13
14
15
16
17
18
19
20
21
22
23
class Program
{
static void Main(string[] args)
{
Console.WriteLine("主线程测试开始..");
Thread th = new Thread(ThMethod);
th.Start();
Thread.Sleep(1000);
Console.WriteLine("主线程测试结束..");
Console.ReadLine();
}


static void ThMethod()
{
Console.WriteLine("异步执行开始");
for (int i = 0; i < 5; i++)
{
Console.WriteLine("异步执行" + i.ToString() + "..");
Thread.Sleep(1000);
}
Console.WriteLine("异步执行完成");
}

Parallel.ForEach 和 ForEach 与 Parallel.For 和 For 一样,一个是异步执行,开辟多个线程。一个是同步执行,开辟一个线程。因此,效率方面同上,主要看执行的什么任务,在此不作具体说明。

下面写了一些代码,从下面的代码中我们可以看出Parallel.ForEach具体开辟了几个线程,如下:

1
2
3
4
5
6
7
8
9
10
11
12
13
14
15
16
17
18
19
20
21
22
23
24
25
26
27
class Program
{
static void Main(string[] args)
{
int[] intList = new int[] { 0, 1, 2, 3, 4, 5, 6, 7, 8, 9 };
ParallelLoopResult result = Parallel.ForEach(intList, (s,pls,longs) =>
{
Console.WriteLine(longs + " " + s);
pls.Stop();
if (pls.IsStopped)
{
Parallel.Invoke(Gs,Ks);//异步调用多个方法
}
});
Console.ReadKey();
}

public static void Gs()
{
Console.WriteLine("异步方法1");
}

public static void Ks()
{
Console.WriteLine("异步方法2");
}
}

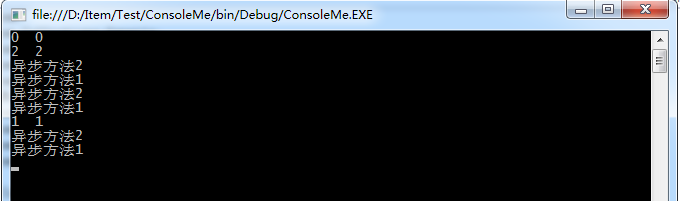
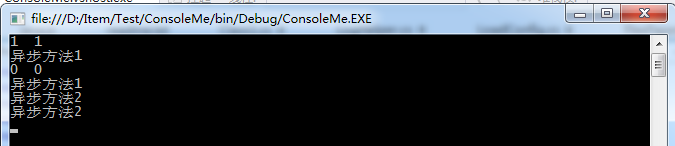
上述代码中,调用了Stop()方法,我们都知道,如果是同步执行的,调用Stop()后,会立即停止执行,那么程序只会输出索引值为0的结果。而在异步中不是这样的,异步迭代是多线程且没有顺序的。其执行结果如下:

多次执行的结果可能不同。

如上图所示,第一个图开辟了三个线程,执行顺序为 0 2 1,第二个图开辟了两个线程,执行顺序为:1 0

下面的Invoke()方法是异步调用其他的方法,在此不作解释,可参考C# Invoke()

设置开启的线程的个数:

1
2
3
4
Parallel.ForEach(NameArray,new ParallelOptions{MaxDegreeOfParallelism=3},(item,pls,i)=>
{

});

假设有三个环境:开发环境(dev)、测试环境(test)、生产环境(prod)。
当我们构建参数时会用到 –prod来指定应用执行环境。脚手架会根据指定的值加载对应的环境配置文件。如:ng build –prod=dev –aot 就是build开发环境的包。那么我们就从这里开始看看Angular项目里环境该怎么配置。

  1. 首先要找到.angular.json文件的production关键词进行如下配置:

    1
    2
    3
    4
    5
    6
    7
    8
    9
    10
    11
    12
    13
    14
    15
    16
    17
    18
    19
    20
    21
    22
    23
    24
    25
    26
    27
    28
    29
    30
    31
    32
    33
    34
    35
    36
    37
    38
    39
    40
    41
    42
    43
    44
    45
    46
    47
    "configurations": {
    "production": {
    "fileReplacements": [{
    "replace": "src/environments/environment.ts",
    "with": "src/environments/environment.prod.ts"
    }],
    "optimization": true,
    "outputHashing": "all",
    "sourceMap": false,
    "extractCss": true,
    "namedChunks": false,
    "aot": true,
    "extractLicenses": true,
    "vendorChunk": false,
    "buildOptimizer": true
    },
    "dev": {
    "fileReplacements": [{
    "replace": "src/environments/environment.ts",
    "with": "src/environments/environment.dev.ts"
    }],
    "optimization": true,
    "outputHashing": "all",
    "sourceMap": false,
    "extractCss": true,
    "namedChunks": false,
    "aot": true,
    "extractLicenses": true,
    "vendorChunk": false,
    "buildOptimizer": true
    },
    "test": {
    "fileReplacements": [{
    "replace": "src/environments/environment.ts",
    "with": "src/environments/environment.test.ts"
    }],
    "optimization": true,
    "outputHashing": "all",
    "sourceMap": false,
    "extractCss": true,
    "namedChunks": false,
    "aot": true,
    "extractLicenses": true,
    "vendorChunk": false,
    "buildOptimizer": true
    }
    }
  2. 再进入environments文件夹
    文件目录:
    ├─ environments
    │ ├─ environment.ts
    │ ├─ environment.test.ts
    │ ├─ environment.prod.ts 开发环境 :

  • environment.ts
    1
    2
    3
    4
    5
    export const environment = {
    production: true,
    envName: 'prod',
    apiBaseURL: 'http://10.**.**.***:81',
    };
    测试环境:
  • environment.test.ts
    1
    2
    3
    4
    5
    6
    7
    // 测试环境
    // ng build --prod=test --aot
    export const environment = {
    production: false,
    envName: 'test',
    apiBaseURL: 'http://10.25.141.150:1111',
    };
    生产环境:
  • environment.prod.ts
    1
    2
    3
    4
    5
    6
    7
    8
    // 生产环境
    // ng build --prod=prod --aot
    export const environment = {
    production: false,
    envName: 'prod',
    apiBaseURL: 'http://10.25.141.150:81',
    };

  1. 在项目的相对路径引入环境再请求接口,代码如下:
    1
    2
    3
    4
    5
    6
    import { environment } from '../environments/environment';

    export const appConfig = {
    apiUrl: environment.apiBaseURL,
    };

    Angular6有些改动, 参考自:

作者:莫莫莫I
链接:https://www.jianshu.com/p/d9397954dc8f
來源:简书
简书著作权归作者所有,任何形式的转载都请联系作者获得授权并注明出处。

好久没碰ionic这个坑了,前两天突然想整个APP玩下,正好把这一套回顾下

版本号:

1
2
node -v
v8.10.0
1
2
ionic -v
4.1.2
1
2
cordova -v
8.0.0
1
2
3
4
5
6
7
8
9
10
11
12
13
14
15
16
17
18
19
20
21
22
23
24
25
C:\Users\gx_143>ng -v

_ _ ____ _ ___
/ \ _ __ __ _ _ _| | __ _ _ __ / ___| | |_ _|
/ △ \ | '_ \ / _` | | | | |/ _` | '__| | | | | | |
/ ___ \| | | | (_| | |_| | | (_| | | | |___| |___ | |
/_/ \_\_| |_|\__, |\__,_|_|\__,_|_| \____|_____|___|
|___/


Angular CLI: 6.2.2
Node: 8.10.0
OS: win32 x64
Angular:
...

Package Version
------------------------------------------------------
@angular-devkit/architect 0.8.2
@angular-devkit/core 0.8.2
@angular-devkit/schematics 0.8.2
@schematics/angular 0.8.2
@schematics/update 0.8.2
rxjs 6.2.2
typescript 2.9.2
1
2
yarn -v
1.9.4

版本不一致是产生坑的很大一个原因!

一、创建项目

1
ionic start demo tabs

二、package.json中的”@ionic/app-scripts”: “3.2.0”,改成

1
2
3
4
"devDependencies": {
"@ionic/app-scripts": "3.1.6",
"typescript": "2.6.2"
},
1
npm install --save @ionic/app-scripts@3.1.6
  1. 使用npm安装ngx-translate模块
    1
    2
    npm install --save @ngx-translate/core@8.0.0
    npm install --save @ngx-translate/http-loader@^2.0.0
    最好是带上版本号,不然可能不兼容!

3、在项目中导入支持的包

1
2
3
4
5
6
7
import { TranslateHttpLoader } from '@ngx-translate/http-loader';
import { HttpClient, HttpClientModule } from '@angular/common/http';

//导出加载函数
export function HttpLoaderFactory(http: HttpClient) {
return new TranslateHttpLoader(http, './assets/i18n/', '.json');
}

4、功能设置

1
2
3
4
5
6
7
8
9
10
11
12
imports: [
BrowserModule,
IonicModule.forRoot(MyApp),
HttpClientModule,
TranslateModule.forRoot({
loader: {
provide: TranslateLoader,
useFactory: HttpLoaderFactory,
deps: [HttpClient]
}
})
],

5、在assets文件夹下新建i18n文件夹,并且新建两个语言的json文件。
比如zh-CN.json和en.json

1
2
3
4
5
6
7
8
9
10
11
//zh-CN.json
{
"welcome": "欢迎使用本应用",
"hello": "你好",
"get-lang": "获取语言类型"
}
//en.json
{
"welcome": "welcome to this app",
"hello": "Hola"
}

json文件是key-value形式的,key值代表要翻译的字符串,value值为特定语言的翻译结果,不用语言的文件一般key值是相同的,只是value值不同。

6、然后在相应的组件中使用Translate服务

1
2
3
4
5
6
7
8
9
10
11
12
13
14
15
16
17
18
19
20
21
22
23
24
25
26
constructor(platform: Platform, statusBar: StatusBar, splashScreen: SplashScreen, private translate: TranslateService) {
platform.ready().then(() => {
// Okay, so the platform is ready and our plugins are available.
// Here you can do any higher level native things you might need.
statusBar.styleDefault();
splashScreen.hide();
});

//添加语言支持
translate.addLangs(['zh-CN', 'en']);
//设置默认语言,一般在无法匹配的时候使用
translate.setDefaultLang('zh-CN');

//获取当前浏览器环境的语言比如en、 zh
let broswerLang = translate.getBrowserLang();
translate.use(broswerLang.match(/en|zh-CN/) ? broswerLang : 'zh-CN');
}
changeLang(lang) {
console.log(lang);
this.translate.use(lang);
}
toggleLang() {
console.log(this.translate.getBrowserLang());
//获取语言风格,相当于更详细的语言类型,比如zh-CN、zh-TW、en-US
console.log(this.translate.getBrowserCultureLang());
}

7、示例模板:

1
2
3
4
5
6
7
8
9
10
11
<div>
<h2>{{ title | translate }}</h2>
<label>
{{ 'hello' | translate }}
<select #langSelect (change)="changeLang(langSelect.value)">
<option *ngFor="let lang of translate.getLangs()" [value]="lang" [selected]="lang === translate.currentLang">{{
lang }}</option>
</select>
</label>
</div>
<button (click)="toggleLang()">{{'get-lang' | translate}}</button>

8、效果:

使用方式和angularjs1中的ng-translate类似,使用translate管道。

1
2
3
ionic cordova platform add android

ionic cordova build android

参考:Angular2国际化

作者:小孩真笨

链接:https://www.jianshu.com/p/72f7c5ffb4f6

來源:简书