深度优先

这个家伙好懒,除了文章什么都没留下

0%

原文地址:https://www.cnblogs.com/hgxh/p/4109012.html

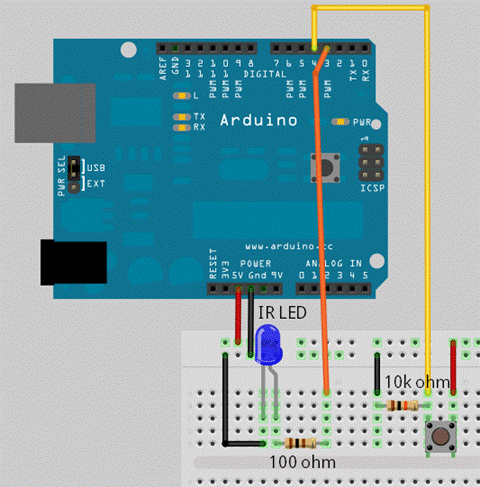
网上有关红外接收的帖子不少,但是关于使用arduino自制红外发射器的帖子却很少,经过网上搜索和自己摸索,给大家发个有arduino自制红外发射器控制led亮灭的例子。关于本例我使用了两块arduino板,一块用于发射,一块用于接收。

一、红外发射(开发板一)

1
2
3
4
5
6
7
8
9
10
11
12
13
14
15
16
17
18
19
20
21
22
23
24
25
26
27
28
/*
* 发射红外线讯号
* 注意! 红外线发射器(IR LED)必须接到 pin 3, 不能接其它脚位,头文件已经定义,所以下面不用设置pin3口的状态
*/
#include <IRremote.h> // 引用 IRRemote 函式库

const int buttonPin = 4; // 按键(pushbutton)接在 pin 4
int buttonState = 0; // 按键状态

IRsend irsend; // 定义 IRsend 物件来发射红外线讯号

void setup()
{
pinMode(buttonPin, INPUT); // 把 buttonPin 设置成 输入
}

void loop()
{
// 读取按键状态
buttonState = digitalRead(buttonPin);

// 检查按键是否被按下
// 有的话 buttonState 会是高电平输出
if (buttonState == HIGH) {
// 发射红外线讯号
irsend.sendNEC(0x4CB3817E, 32); // 这个编码即你按的键(接pin4)的编码,可以随意更改,如果要控制其他设备,只需将此编码改为相应编码就行
}
}

将以上程序烧入开发板一中,发射部分就制作完毕。下面是红外接收部分。

二、红外接收(开发板二)

1
2
3
4
5
6
7
8
9
10
11
12
13
14
15
16
17
18
19
20
21
22
23
24
25
26
27
28
29
30
31
32
33
34
35
36
37
38
39
40
41
//本例来自于红外接收模块的IRremote自带范例
//已经作出了修改
//改为当有遥控器的按键按下时,接在数字引脚4上的发光LED就会点亮,再按一下按键,led熄灭
/*电路连接
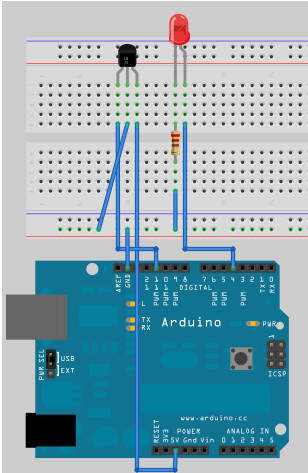
*红外接收器的VOUT接在数字引脚11上,GND接控制板的GND,VCC接控制板上+5V
*发光二极管引脚接在数字引脚4上,通过220欧姆电阻回到控制板的GND
*效果,当遥控器按下按键时,发光二极管就会闪烁,同时电脑的串口会出现按键的命令编码.
*/


#include <IRremote.h>

int RECV_PIN = 11;//定义红外接收器的引脚为11
int LED_PIN = 4; //定义发光LED引脚数字4
int a = 0;
IRrecv irrecv(RECV_PIN);

decode_results results;

void setup()
{
Serial.begin(9600);
irrecv.enableIRIn(); // 初始化红外接收器
pinMode(LED_PIN, OUTPUT); //设置发光LED引脚数字4
}

void loop() {
if (irrecv.decode(&results)) {
if (results.value == 0x4CB3817E & a == 0) //此处的32位值与发射部分发射的值要保持一致
{
digitalWrite(LED_PIN, HIGH); //LED点亮
a = 1;
}
else if (results.value == 0x4CB3817E & a == 1)
{
digitalWrite(LED_PIN, LOW); //LED熄灭
a = 0;
}
irrecv.resume(); // 接收下一个值
}
}

将以上部分程序烧入开发板二即完成接收部分制作。
两块开发板上电,当按下发射板上按键时,led点亮,再次按下发射板上按键是,led熄灭。

可能遇到的报错:

编译出错提示为:

提示出错的原因是:IRremoteTools冲突。百度一下原因为Arduino 1.5.5 r2以后加入的RobotIRremote 库与 IRremote库有冲突。在IRremoteTools.cpp中有如下代码:

1
2
3
4
5
6
7
#include "IRremote.h"
#include "IRremoteTools.h"
#include <Arduino.h>
 
int RECV_PIN = TKD2; // the pin the IR receiver is connected to
IRrecv irrecv(RECV_PIN); // an instance of the IR receiver object
decode_results results; // container for received IR codes

上述代码中将TKD2赋予 RECV_PIN,而我们写的代码里并没有定义TKD2,因此编译程序执行到这时报错。
2. 删除或剪切走冲突文件
解决方法是在Arduino安装目录…Arduino\libraries\RobotIRremote\src 文件夹下将如下两个文件删除或剪切到非编译搜索路径下的某个位置即可

本机安装的路径为:C:\Program Files (x86)\Arduino\libraries\RobotIRremote\src

作者:iracer
来源:CSDN
原文:https://blog.csdn.net/iracer/article/details/50082373
版权声明:本文为博主原创文章,转载请附上博文链接!

一、谈一谈正向代理和反向代理

https://blog.csdn.net/zt15732625878/article/details/78941268

二、Nginx配置详解

https://www.cnblogs.com/knowledgesea/p/5175711.html

三、Nginx代理功能与负载均衡详解

https://www.cnblogs.com/knowledgesea/p/5199046.html

1
2
3
4
5
6
7
8
9
10
11
12
13
14
15
16
17
18
19
20
21
22
23
24
25
26
27
28
29
30
31
32
33
34
35
36
37
38
39
40
41
42
43
44
45
46
47
48
49
50
51
52
53
54
55
56
57
58
59
60
61
62
63
64
65
66
67
68
69
70
71
72
73
74
75
76
77
78
79
80
81
82
83
84
85
86
87
88
89
90
91
92
93
94
95
96
97
98
99
100
101
102
103
104
105
106
107
108
109
110
111
112
113
114
115
116
117
118
119
120
121
122
123
124
125
#user  nobody;
worker_processes 1;

#error_log logs/error.log;
#error_log logs/error.log notice;
#error_log logs/error.log info;

#pid logs/nginx.pid;


events {
worker_connections 1024;
}


http {
include mime.types;
default_type application/octet-stream;

#log_format main '$remote_addr - $remote_user [$time_local] "$request" '
# '$status $body_bytes_sent "$http_referer" '
# '"$http_user_agent" "$http_x_forwarded_for"';

#access_log logs/access.log main;

sendfile on;
#tcp_nopush on;

#keepalive_timeout 0;
keepalive_timeout 0;

#gzip on;
upstream www_server_pool {
server 192.168.237.103:80;
server 192.168.237.109:80;
}
server {
listen 80;
server_name www_server_pool;
#charset koi8-r;

#access_log logs/host.access.log main;

location / {
proxy_pass http://www_server_pool;
root html;
index index.html index.htm;
proxy_connect_timeout 1; #nginx服务器与被代理的服务器建立连接的超时时间,默认60秒
proxy_read_timeout 1; #nginx服务器想被代理服务器组发出read请求后,等待响应的超时间,默认为60秒。
proxy_send_timeout 1; #nginx服务器想被代理服务器组发出write请求后,等待响应的超时间,默认为60秒。
proxy_ignore_client_abort on; #客户端断网时,nginx服务器是否终端对被代理服务器的请求。默认为off。
proxy_set_header Host $host; #只要用户在浏览器中访问的域名绑定了 VIP VIP 下面有RS;则就用$host ;host是访问URL中的域名和端口 www.taobao.com:80
proxy_set_header X-Real-IP $remote_addr; #把源IP 【$remote_addr,建立HTTP连接header里面的信息】赋值给X-Real-IP;这样在代码中 $X-Real-IP来获取 源IP
proxy_set_header X-Forwarded-For $proxy_add_x_forwarded_for;#在nginx 作为代理服务器时,设置的IP列表,会把经过的机器ip,代理机器ip都记录下来,用 【,】隔开;代码中用 echo $x-forwarded-for |awk -F, '{print $1}' 来作为源IP
}

#error_page 404 /404.html;

# redirect server error pages to the static page /50x.html
#
error_page 500 502 503 504 /50x.html;
location = /50x.html {
root html;
}

# proxy the PHP scripts to Apache listening on 127.0.0.1:80
#
#location ~ \.php$ {
# proxy_pass http://127.0.0.1;
#}

# pass the PHP scripts to FastCGI server listening on 127.0.0.1:9000
#
#location ~ \.php$ {
# root html;
# fastcgi_pass 127.0.0.1:9000;
# fastcgi_index index.php;
# fastcgi_param SCRIPT_FILENAME /scripts$fastcgi_script_name;
# include fastcgi_params;
#}

# deny access to .htaccess files, if Apache's document root
# concurs with nginx's one
#
#location ~ /\.ht {
# deny all;
#}
}


# another virtual host using mix of IP-, name-, and port-based configuration
#
#server {
# listen 8000;
# listen somename:8080;
# server_name somename alias another.alias;

# location / {
# root html;
# index index.html index.htm;
# }
#}


# HTTPS server
#
#server {
# listen 443 ssl;
# server_name localhost;

# ssl_certificate cert.pem;
# ssl_certificate_key cert.key;

# ssl_session_cache shared:SSL:1m;
# ssl_session_timeout 5m;

# ssl_ciphers HIGH:!aNULL:!MD5;
# ssl_prefer_server_ciphers on;

# location / {
# root html;
# index index.html index.htm;
# }
#}
}

四、Nginx转发

1
2
3
4
5
6
7
8
9
10
11
12
13
14
15
16
17
18
19
20
21
22
23
24
25
26
27
28
29
30
31
32
33
34
35
36
37
38
39
40
41
42
43
44
45
46
47
48
49
50
user  nginx;
worker_processes 1;

error_log /var/log/nginx/error.log warn;
pid /var/run/nginx.pid;

events {
worker_connections 1024;
}

http {
server {
listen 80;
server_name music.bfsdfs.com;
location / {
proxy_pass http://182.61.181.137:8090/;
proxy_set_header Host $host;
proxy_set_header X-Real-Ip $remote_addr;
proxy_set_header X-Forwarded-For $remote_addr;
}
}
server {
listen 80;
server_name love.bfsdfs.com;
location / {
proxy_pass http://182.61.181.137:2020/;
proxy_set_header Host $host;
proxy_set_header X-Real-Ip $remote_addr;
proxy_set_header X-Forwarded-For $remote_addr;
}
}
include /etc/nginx/mime.types;
default_type application/octet-stream;

log_format main '$remote_addr - $remote_user [$time_local] "$request" '
'$status $body_bytes_sent "$http_referer" '
'"$http_user_agent" "$http_x_forwarded_for"';

access_log /var/log/nginx/access.log main;

sendfile on;
#tcp_nopush on;

keepalive_timeout 65;

#gzip on;

include /etc/nginx/conf.d/*.conf;

}

五、Https配置

1
2
3
4
5
6
7
8
9
10
11
12
13
14
15
16
17
18
19
20
21
22
23
24
25
26
27
28
29
30
31
32
33
34
35
36
37
38
39
40
41
42
43
44
45
46
47
48
49
50
51
52
53
54
user  nginx;
worker_processes 1;

error_log /var/log/nginx/error.log warn;
pid /var/run/nginx.pid;


events {
worker_connections 1024;
}

http {
server {
listen 80;
server_name wx.bfsdfs.com;
rewrite ^(.*)$ https://$host$1 permanent;
}
server {
listen 443;
server_name wx.bfsdfs.com;
ssl on;
ssl_certificate cert/2168764_wx.bfsdfs.com.pem;
ssl_certificate_key cert/2168764_wx.bfsdfs.com.key;
ssl_session_timeout 5m;
ssl_ciphers ECDHE-RSA-AES128-GCM-SHA256:ECDHE:ECDH:AES:HIGH:!NULL:!aNULL:!MD5:!ADH:!RC4;
ssl_protocols TLSv1 TLSv1.1 TLSv1.2;
ssl_prefer_server_ciphers on;
location / {
proxy_pass http://182.61.181.137:2020/;
proxy_set_header Host $host;
proxy_set_header X-Real-Ip $remote_addr;
proxy_set_header X-Forwarded-For $remote_addr;
}
}

include /etc/nginx/mime.types;
default_type application/octet-stream;

log_format main '$remote_addr - $remote_user [$time_local] "$request" '
'$status $body_bytes_sent "$http_referer" '
'"$http_user_agent" "$http_x_forwarded_for"';

access_log /var/log/nginx/access.log main;

sendfile on;
#tcp_nopush on;

keepalive_timeout 65;

#gzip on;

include /etc/nginx/conf.d/*.conf;

}

以前我都是通过定义一个delegate来写委托的,但是最近看一些外国人写的源码都是用action和func方式来写,当时感觉对这很陌生所以看起源码也觉得陌生,所以我就花费时间来学习下这两种方式,然后发现确实代码简洁了不少。这两种方式我们也可以去实践的过程去慢慢运用。

先说一下委托:

模拟一下场景:小明最近学习情绪高涨,以前买的书已经满足不了欲望,打算去买本(一个程序员的自我修养)。可是呢以前总是跑书厂买,nm,太远了扛不住,就去跑去附近书店去买,小明去给钱就弄了一本书回来,这个过程就是委托。开始分析

1:小明要买一本一个程序员自我修养的书籍(xx书就不买)硬性要求 (这就是要定义委托性质)

代码:

1
private delegate void BuyBook();

2:附近书店 (委托的方法)

代码:

1
2
3
4
public static void Book()
{
Console.WriteLine("我是提供书籍的");
}

3:小明和书店建立关系(给委托绑定方法)

代码:

1
BuyBook buybook = new BuyBook(Book);

4:小明给钱拿书(触发)

1
buybook();

上面的内容是为了能理解委托的用法下面呢我开始讲解Action和Func

Action的用法

1:小明很是苦恼,我就是买一本书籍,每次都让我定义下,烦死了,有没有一种方法不去定义委托呢,那么有吗,还真有,就是我们今天讲的Action

1
2
Action BookAction = new Action(Book);
BookAction();

这样是不是就简单了很多

2:小明现在又不满意了,我把一个程序员的自我修养看完了,现在呢想买本其他书,那怎么办,我是不是要重新再次定义委托。其实不需要你只需要把参数穿过来就可以了。下面我们看Action的用法

1
2
3
4
5
6
7
8
9
static void Main(string[] args)
{
Action<string> BookAction = new Action<string>(Book);
BookAction("百年孤独");
}
public static void Book(string BookName)
{
Console.WriteLine("我是买书的是:{0}",BookName);
}

3:现在小明又改变主意了,我不仅要自己选择书籍,我还要在一个牛逼的书籍厂家买,有没有这种方式呢,那么告诉你有,Action<in T1,in T2>

1
2
3
4
5
6
7
8
9
static void Main(string[] args)
{
Action<string,string> BookAction = new Action<string,string>(Book);
BookAction("百年孤独","北京大书店");
}
public static void Book(string BookName,string ChangJia)
{
Console.WriteLine("我是买书的是:{0}来自{1}",BookName,ChangJia);
}

Func的用法

小明又发生疑问了,每次我自己都去书店去拿书,有没有一种方法直接送到我家里呢,那么Func专门提供了这样的服务

Func 解释 封装一个不定具有参数(也许没有)但却返回 TResult 参数指定的类型值的方法。

1:我们先看一个没有参数只有返回值的方法

1
2
3
4
5
6
7
8
9
static void Main(string[] args)
{
Func<string> RetBook = new Func<string>(FuncBook);
Console.WriteLine(RetBook);
}
public static string FuncBook()
{
return "送书来了";
}

2:有参数有返回值的方法

1
2
3
4
5
6
7
8
9
static void Main(string[] args)
{
Func<string,string> RetBook = new Func<string,string>(FuncBook);
Console.WriteLine(RetBook("aaa"));
}
public static string FuncBook(string BookName)
{
return BookName;
}

3:Func一个很重要的用处就是传递值,下面我举一个简单的代码来说明

1
2
3
4
5
Func<string> funcValue = delegate
{
return "我是即将传递的值3";
};
DisPlayValue(funcValue);

注释1:DisplayVaue是处理传来的值,比喻缓存的处理,或者统一添加数据库等

1
2
3
4
5
private static void DisPlayValue(Func<string> func)
{
string RetFunc = func();
Console.WriteLine("我在测试一下传过来值:{0}",RetFunc);
}

总结

1:Action用于没有返回值的方法(参数可以根据自己情况进行传递)

2:Func恰恰相反用于有返回值的方法(同样参数根据自己情况情况)

3:记住无返回就用action,有返回就用Func

转自:https://www.cnblogs.com/LipeiNet/p/4694225.html