深度优先

这个家伙好懒,除了文章什么都没留下

0%

https://www.cnblogs.com/zhaopei/p/12840786.html

打包成单文件exe

通常我们开发出来的WinForm程序,除了一个exe文件还会有很多dll文件。
那么有没有办法只生成一个exe文件,让程序更加方便传播和使用,答案是肯定的。
NuGet搜索 Costura.Fody并下载,然后重新生成解决方案即可,你在去bin目录查看,原来的一堆dll不见了。

.net core官方支持打包成单文件

如果你使用的.net core 3.0,那么你可以直接使用官方支持的发布单文件功能。
直接使用命令 dotnet publish -r win10-x64 /p:PublishSingleFile=true
或者修改一下项目文件

1
2
3
4
5
6
7
8
9
10
11
12
13
<Project Sdk="Microsoft.NET.Sdk.WindowsDesktop">
<PropertyGroup>
<OutputType>Exe</OutputType>
<TargetFramework>netcoreapp3.0</TargetFramework>
<UseWindowsForms>true</UseWindowsForms>
<RuntimeIdentifier>win10-x64</RuntimeIdentifier>//发布平台
<PublishSingleFile>true</PublishSingleFile>//是否单个exe
</PropertyGroup>
<PropertyGroup>
<PublishTrimmed>true</PublishTrimmed>//启用压缩
</PropertyGroup>
</Project>

自动升级更新

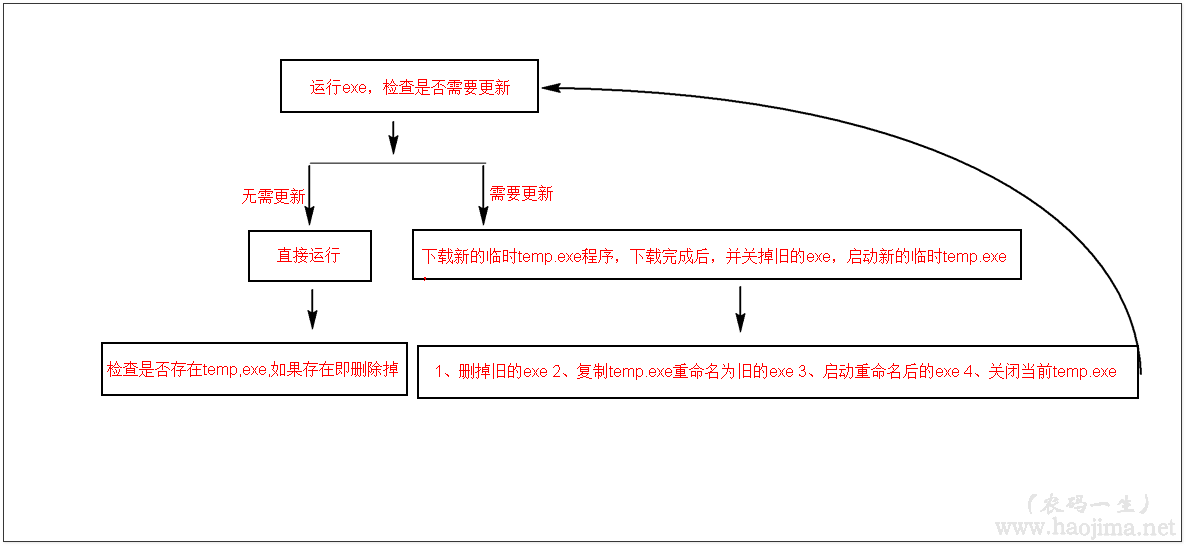
一个有生命的桌面程序理应做到可以自动升级。很多人在做自动升级更新时会执行一个单独的升级exe,也就是说一个完整的程序起码包括两个exe。个人觉得不够优雅,如果能用一个exe自己更新自己岂不是完美。思考如下:

自己更新自己 ,然后杀了自己,启动新的自己。

代码可参考 https://github.com/zhaopeiym/IoTClient/blob/master/IoTClient.Tool/IndexForm.cs
中的 CheckUpgradeAsync 方法。

1
2
3
4
5
6
7
8
9
10
11
12
13
14
15
16
17
18
19
20
21
22
23
24
25
26
27
28
29
30
31
32
33
34
35
36
37
38
39
40
41
42
43
44
45
46
47
48
49
50
51
52
53
54
55
56
57
58
59
60
61
62
63
64
65
66
67
68
69
70
71
72
73
74
75
76
77
78
79
80
/// <summary>
/// 检查当前是否需要升级
/// </summary>
private async Task CheckUpgradeAsync()
{
UpgradeFileManage();
HttpClient http = new HttpClient();
var content = new StringContent(JsonConvert.SerializeObject(new VersionCheckInput()));
content.Headers.ContentType = new MediaTypeHeaderValue("application/json");
var response = await http.PostAsync("https://download.haojima.net/api/IoTClient/VersionCheck", content);
var result = await response.Content.ReadAsStringAsync();
var VersionObj = JsonConvert.DeserializeObject<ResultBase<VersionCheckOutput>>(result);
if (VersionObj.Code == 200 && VersionObj.Data.Code == 1)
{
if (MessageBox.Show("IoTClient有新版本,是否升级到最新版本?", "版本升级", MessageBoxButtons.OKCancel) == DialogResult.OK)
{
if (new UpgradeForm().ShowDialog() != DialogResult.OK) return;
var newApp = Application.StartupPath + @"\temp." + Path.GetFileName(Application.ExecutablePath);
//打开临时文件 关闭并旧版本
Process.Start(newApp);
Close();
Environment.Exit(0);
}
}
}

/// <summary>
/// 升级文件处理
/// </summary>
private void UpgradeFileManage()
{
//如果启动的升级临时文件,
//则1、删除旧版本 2、复制当前临时文件为新版本 3、启动新版本 4、关闭当前打开的临时版本
if (Path.GetFileName(Application.ExecutablePath).Contains("temp."))
{
var filePath = Path.Combine(Application.StartupPath, Path.GetFileName(Application.ExecutablePath).Replace("temp.", ""));
var newFilePath = filePath;
try
{
try
{
//2.1删除旧版本
if (File.Exists(filePath)) File.Delete(filePath);
}
catch (Exception)
{
//如果因为进程正在使用中则休眠后再重试
//出现此问题的原因是,上一个程序还没关闭,这个程序就启动了,启动后会执行删除上一个程序,所以报错。
Thread.Sleep(500);
if (File.Exists(filePath)) File.Delete(filePath);
}
//3、复制临时文件为新的文件 打开新的文件
File.Copy(Application.ExecutablePath, newFilePath);
//3、打开新的文件
Process.Start(filePath);
//4、关闭临时文件
//Close();
Environment.Exit(0);
}
catch (Exception ex)
{
MessageBox.Show("升级失败 " + ex.Message);
}
}
//4.2如果当前启动的不是临时文件,则删除临时文件。
else
{
var filePath = Path.Combine(Application.StartupPath, "temp." + Path.GetFileName(Application.ExecutablePath));
try
{
if (File.Exists(filePath)) File.Delete(filePath);
}
catch (Exception)
{
Thread.Sleep(500);
if (File.Exists(filePath)) File.Delete(filePath);
}
}
}

下载新版本文件

1
2
3
4
5
6
7
8
9
10
11
12
13
14
15
16
17
18
19
20
21
22
23
24
25
26
27
28
29
30
31
32
33
34
35
36
37
38
39
40
41
42
43
44
45
46
47
48
49
50
51
52
53
54
55
56
57
58
59
60
61
62
63
64
public UpgradeForm()
{
InitializeComponent();
TopMost = true;
StartPosition = FormStartPosition.CenterScreen;
FormBorderStyle = FormBorderStyle.FixedSingle;
CheckForIllegalCrossThreadCalls = false;
Task.Run(async () =>
{
await DownloadAsync();
DialogResult = DialogResult.OK;
Close();
});
}

public async Task DownloadAsync()
{
long downloadSize = 0;//已经下载大小
long downloadSpeed = 0;//下载速度
using (HttpClient http = new HttpClient())
{
string contentType = "application/json";
http.DefaultRequestHeaders.Accept.Add(new MediaTypeWithQualityHeaderValue(contentType));
http.DefaultRequestHeaders.Add("Authorization", $"Bearer 043fc7d1a15bbaa6e48591baadc6f8ea");

var httpResponseMessage = await http.GetAsync("http://localhost/api/v1.0/niuNiuCalc/download?fileName=NiuNiuCalcCsClient.exe&clientType=PC", HttpCompletionOption.ResponseHeadersRead);//发送请求
var contentLength = httpResponseMessage.Content.Headers.ContentLength; //文件大小
if (contentLength == null)
{
MessageBox.Show("服务器忙,请稍后再试。");
return;
}
using (var stream = await httpResponseMessage.Content.ReadAsStreamAsync())
{
var readLength = 102400;//100K
byte[] bytes = new byte[readLength];
int writeLength;
var beginSecond = DateTime.Now.Second;//当前时间秒
//使用追加方式打开一个文件流
var filePath = Application.StartupPath + @"\temp." + Path.GetFileName(Application.ExecutablePath);
using (FileStream fs = new FileStream(filePath, FileMode.Append, FileAccess.Write))
{
while ((writeLength = stream.Read(bytes, 0, readLength)) > 0)
{
fs.Write(bytes, 0, writeLength);
downloadSize += writeLength;
downloadSpeed += writeLength;
progressBar1.Invoke((Action)(() =>
{
var endSecond = DateTime.Now.Second;
if (beginSecond != endSecond)//计算速度
{
downloadSpeed = downloadSpeed / (endSecond - beginSecond);
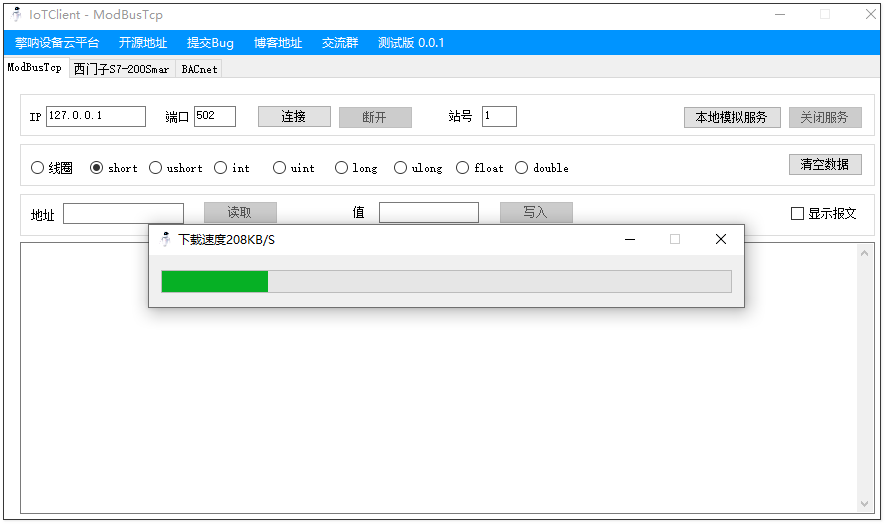
Text = "下载速度" + downloadSpeed / 1024 + "KB/S";
beginSecond = DateTime.Now.Second;
downloadSpeed = 0;//清空
}
progressBar1.Value = Math.Max((int)(downloadSize * 100 / contentLength), 1);
}));
}
}
}
}
}

部分更新可配置文件

Version.json 文件用于比较每个组件信息

1
2
3
4
5
6
7
8
9
10
11
12
13
14
15
{
"Version": "1.0.01",
"FileName": "DcMoitorTools.zip",
"ReleaseTime": "2019-11-29 12:10:07",
"UpdateContent": "修复一堆bug,添加一些功能,优化一些体验...",
"Sha1": "703b9e5ae97e51c24b6ca774a6e97a5f0c608fa1",
"Files": [
{
"Name": "BD.Text.Test.dll",
"Version": "1.0.0.10",
"Path": "BD.Text.Test.dll",
"Sha1": "852ac3cc7a75f4554c14f9901996ea409b692fa9"
}
]
}

效果图

摄像头安装

硬件安装

静电处理,切记断电安装,不然摄像头很容易GG

摄像头电路板与 Raspberry Pi 通过一条 15 芯的排线进行连接。

拉起连接座两端的卡扣。

蓝色标记应该正对着网络接口方向。

软件安装

修改树莓派配置,开启摄像头模块。

1
sudo raspi-config

摄像头模块检测

1
2
3
4
5
vcgencmd get_camera
supported=1 detected=1
# 或者
ls -al /dev/video0
crw-rw----+ 1 root video 81, 3 Mar 9 01:06 /dev/video0

摄像头常规操作

目前提供了三个应用程序:

  • raspistill 捕捉图像
  • raspivid 捕捉视频
  • raspistillyuv 捕捉图像

raspistill 使用了图像编码组件,raspivid使用了视频编码组件,raspistillyuv没有使用编码组件,而是直接将 YUV 或 RGB 从摄像组件输出到文件

  • 拍照测试 将显示来自摄像头 5 秒钟的预览图像,并且拍摄一张照片

    1
    raspistill -v -o test.jpg
  • 查看图片

    1
    xdg-open test.jpg
  • 视频录制

    1
    raspivid -o vv.h264 -t 10000s
  • 播放视频

    1
    vlc vv.h264
  • 帮助文档 使用箭头键来滚动,然后键入q退出

    1
    2
    raspivid | less
    raspistill | less
  • 两秒钟(时间单位为毫秒)延迟后拍摄一张照片,并保存为 image.jpg

    1
    raspistill -t 2000 -o image.jpg
  • 拍摄一张自定义大小的照片

    1
    raspistill -t 2000 -o image.jpg -w 640 -h 480
  • 降低图像质量,减小文件尺寸

    1
    raspistill -t 2000 -o image.jpg -q 5
  • 强制使预览窗口出现在坐标为 100,100 的位置,并且尺寸为宽 300 和高 200 像素

    1
    raspistill -t 2000 -o image.jpg -p 100,100,300,200
  • 禁用预览窗口

    1
    raspistill -t 2000 -o image.jpg
  • 将图像保存为 PNG 文件(无损压缩格式,但是要比 JPEG 速度慢)。注意,当选择图像编码时,文件扩展名将被忽略

    1
    raspistill -t 2000 -o image.png –e png
  • 向 JPEG 文件中添加一些 EXIF 信息。该命令将会把作者名称标签设置为 Dreamcolor,GPS 海拔高度为 123.5米

    1
    raspistill -t 2000 -o image.jpg -x IFD0.Artist=Dreamcolor -x GPS.GPSAltitude=1235/10
  • 设置浮雕风格图像特效

    1
    raspistill -t 2000 -o image.jpg -ifx emboss
  • 设置 YUV 图像的 U 和 V 通道为指定的值(128:128 为黑白图像)

    1
    raspistill -t 2000 -o image.jpg -cfx 128:128
  • 仅显示两秒钟预览图像,而不对图像进行保存

    1
    raspistill -t 2000
  • 间隔获取图片,在 10 分钟(10 分钟 = 600000 毫秒)的时间里,每 10 秒获取一张,并且命名为 image_number_001_today.jpg,image_number_002_today.jpg… 的形式,并且最后一张照片将命名为 latest.jpg。

    1
    raspistill -t 600000 -tl 10000 -o image_num_%03d_today.jpg -l latest.jpg
  • 获取一张照片并发送至标准输出设备

    1
    raspistill -t 2000 -o -
  • 获取一张照片并保存为一个文件

    1
    raspistill -t 2000 -o - > my_file.jpg
  • 摄像头一直工作,当按下回车键时获取一张照片

    1
    raspistill -t 0 -k -o my_pics%02d.jpg
  • 使用默认设置录制一段 5 秒钟的视频片段(1080p30)

    1
    raspivid -t 5000 -o video.h264
  • 使用指定码率(3.5Mbits/s)录制一段 5 秒钟的视频片段

    1
    raspivid -t 5000 -o video.h264 -b 3500000
  • 使用指定帧率(5fps)录制一段 5 秒钟的视频片段

    1
    raspivid -t 5000 -o video.h264 -f 5
  • 发送到标准输出设备一段 5 秒钟经过编码的摄像头流图像

    1
    raspivid -t 5000 -o -
  • 保存到文件一段 5 秒钟经过编码的摄像头流图像

    1
    raspivid -t 5000 -o - > my_file.h264

安装docker

1
2
3
4
5
6
7
8
curl -fsSL https://get.docker.com -o get-docker.sh
sh get-docker.sh

# 添加docker用户组
sudo groupadd docker #添加docker用户组
sudo gpasswd -a $USER docker #将登陆用户加入到docker用户组中
newgrp docker #更新用户组
docker ps #测试docker命令是否可以使用sudo正常使用

安装centos7镜像

1
2
docker pull centos:7
sudo docker run -tid --name rasp --privileged centos:7 /usr/sbin/init

安装MySQL镜像

1
2
3
4
5
6
7
8
9
10
11
12
13
14
15
16
17
18
19
20
21
22
23
24
25
26
27
28
29
30
31
32
33
34
35
36
37
38
39
40
41
42
43
44
45
46
47
48
49
50
51
52
53
54
55
56
57
58
59
60
61
62
63
64
65
66
67
68
docker pull ibex/debian-mysql-server-5.7
docker run --name skymysql -e MYSQL_ROOT_PASSWORD=root -d --restart unless-stopped -p 3306:3306 ibex/deb

# 进入docker
root@050b1555fc9c:/# mysql -uroot -proot
mysql: [Warning] Using a password on the command line interface can be insecure.
Welcome to the MySQL monitor. Commands end with ; or \g.
Your MySQL connection id is 3
Server version: 5.7.26-1 (Debian)

Copyright (c) 2000, 2019, Oracle and/or its affiliates. All rights reserved.

Oracle is a registered trademark of Oracle Corporation and/or its
affiliates. Other names may be trademarks of their respective
owners.

Type 'help;' or '\h' for help. Type '\c' to clear the current input statement.

mysql> CREATE USER 'sky'@'%' IDENTIFIED BY 'root';
Query OK, 0 rows affected (0.01 sec)

mysql> create database swg default charset utf8 collate utf8_general_ci;
Query OK, 1 row affected (0.00 sec)

mysql> grant all privileges on swg.* to 'sky'@'%' identified by 'root';
Query OK, 0 rows affected, 1 warning (0.00 sec)

mysql> flush privileges;
Query OK, 0 rows affected (0.01 sec)

mysql> use swg;
Database changed

CREATE TABLE `rain` (
`id` int(10) unsigned NOT NULL AUTO_INCREMENT,
`host` varchar(25) DEFAULT NULL,
`rain` tinyint(1) unsigned DEFAULT NULL,
`create_time` timestamp NULL DEFAULT CURRENT_TIMESTAMP ON UPDATE CURRENT_TIMESTAMP,
PRIMARY KEY (`id`)
) ENGINE=InnoDB DEFAULT CHARSET=utf8;


CREATE TABLE `temper` (
`id` int(10) unsigned NOT NULL AUTO_INCREMENT,
`temp` double DEFAULT NULL COMMENT '',
`rh` double DEFAULT NULL COMMENT '',
`host` varchar(25) DEFAULT NULL,
`create_time` timestamp NULL DEFAULT CURRENT_TIMESTAMP ON UPDATE CURRENT_TIMESTAMP,
PRIMARY KEY (`id`)
) ENGINE=InnoDB DEFAULT CHARSET=utf8;

Query OK, 0 rows affected (0.05 sec)

CREATE TABLE `wave` (
`id` int(10) unsigned NOT NULL AUTO_INCREMENT,
`host` varchar(25) DEFAULT NULL,
`distance` double DEFAULT NULL,
`create_time` timestamp NULL DEFAULT CURRENT_TIMESTAMP ON UPDATE CURRENT_TIMESTAMP,
PRIMARY KEY (`id`)
) ENGINE=InnoDB DEFAULT CHARSET=utf8 COMMENT='';
Query OK, 0 rows affected (0.05 sec)

mysql> exit
# 设置docker 容器时间区域
root@050b1555fc9c:/# cp /usr/share/zoneinfo/Asia/Shanghai /etc/localtime
root@050b1555fc9c:/# date
Mon Feb 24 20:07:14 CST 2020
# 重启 容器

安装crontab

1
2
3
4
5
6
7
8

yum install crontabs
systemctl enable crond
systemctl status crond
systemctl start crond
crontab -e
*/1 * * * * /Data/apps/php/bin/php /Data/apps/nginx/html/php/index.php
systemctl restart crond

保存自己更改过的容器

1
2
3
4
5
6
7
8
9
10
11
12
13
14
15
16
17
18
docker commit -m "树莓派4传感器专用,软件安装目录位于/Data,运行镜像时需赋予权限--privileged=true" 1fe lxamu_centos
# 启动容器
sudo docker run -tid -p 80:80 --name rasp4 --privileged=true lxamu_centos /usr/sbin/init
# 保存镜像
docker save -o rasp4_centos.tar rasp4_centos:latest
# 导入镜像
cat rasp4_centos.tar | docker import - rasp4_centos:latest

sudo docker run -tid -p 80:80 --name rasp --privileged rasp4_centos /usr/sbin/init

# 导出
docker export 容器id > test.tar
#导入,注意别少了import后面的-
cat test.tar | docker import - test
# 导出
docker save容器id > test.tar
# 导入
docker load < test.tar